ArtNouveauVision Blog

How Do You Interpret the Meaning of Abstract Art?
Abstract art invites viewers to look beyond literal shapes and delve into an emotional, sensory experience. From bold splashes of color to subtle textures, abstract wall art offers an open-ended narrative that each person can personalize. In this comprehensive guide, we’ll explore foundational concepts, practical interpretation techniques, real-world examples, and tips for integrating abstract pieces into your home—and all with vibrant, engaging anecdotes to illustrate each point. Understanding the Essence of Abstraction At its core, abstraction liberates art from strict representation. Pioneers like Wassily Kandinsky saw color as a language of emotion; his swirling compositions feel like visual symphonies. Meanwhile, Jackson Pollock’s drip paintings channel raw energy through spontaneous, all-over patterns. By removing identifiable subjects, these masters compel us to engage with pure form, motion, and color balance. Emotional Abstraction: Works such as Mark Rothko’s color fields immerse viewers in profound moods—his deep reds can feel both intimate and overwhelming. Organic Abstraction: Helen Frankenthaler’s soak-stain technique produces fluid shapes reminiscent of water flowing across a canvas. Structured Abstraction: Piet Mondrian’s grid-based pieces, explored further in Abstract vs. Geometric, reveal how precise geometry evokes harmony and rhythm. Why It Matters Understanding these categories helps you recognize the artist’s intent: are they seeking to calm, energize, or provoke thought? Knowing this sets the stage for a more meaningful connection. Techniques for Personal Interpretation Interpreting abstract art isn’t about finding a single “correct” answer—it’s about honoring your reaction. Try these methods: Gut Reaction: Spend thirty seconds observing without overthinking. Does the piece feel tranquil or chaotic? This immediate response often reveals your subconscious response. Color Psychology: Note how colors affect your mood—blues tend to soothe, while yellows can spark optimism. For instance, Vincent van Gogh’s yellow hues in his later works radiate warmth and hope. Shape Language: Curved lines suggest softness or movement; sharp angles can feel tense or dynamic. Think of the jagged forms in Franz Kline’s black-and-white canvases—they feel bold and confrontational. Context Clues: Titles, artist statements, or exhibition themes can provide insight, but don’t let them limit your personal narrative. Imagine a piece titled Echoes—you might see ripples in water, while someone else envisions sound waves. Real-World Illustrations Jackson Pollock’s Number 31, 1950: Many viewers compare the drips to constellations—each thread of paint a star in a vast cosmic network. Mark Rothko’s Orange and Yellow: Exhibited in a dimly lit room, this work envelops you in a glowing, almost spiritual space. Piet Mondrian’s Broadway Boogie Woogie: His precision grids and colored squares pulse like New York City traffic and jazz beats. Each example shows how abstraction can evoke memories, environments, and emotions without depicting them directly. Bringing Abstract Art Home When choosing pieces for your living space, consider both visual harmony and emotional resonance: Balance & Scale: A large abstract canvas above a neutral sofa becomes an anchor point. Conversely, a series of small works can form a gallery wall, mixing prints and sculptural elements. Color Coordination: Pull accent colors from the artwork into cushions, rugs, or decorative objects to create unity. Texture Play: Many abstract wall art pieces use heavy impasto or mixed media. These textures add depth, especially when lit from different angles. Creative Display Ideas Layered Frames: Mount a transparent plexiglass panel in front of your art to let wall color peek through, adding dimension. Rotating Showcase: Change the piece seasonally to refresh your environment—light pastels for spring, rich tones for autumn. Focus Lighting: Use adjustable picture lights or track lighting to highlight brushstrokes and textures, transforming perception as you move around the room. Deepening Your Engagement Journaling Sessions: Write your impressions, then return after a week to see how your interpretation has evolved. Group Discussions: Host a small gathering where each guest describes what they see—discover how diverse personal stories can be. Mindful Meditation: Sit quietly in front of the piece, focusing on a single color or shape for two minutes. Notice how thoughts shift. Conclusion: The Ever-Evolving Dialogue Abstract art thrives on its openness. It’s a dynamic conversation between creator and viewer, constantly rewritten with each encounter. Whether you’re an experienced collector or a curious newbie, engaging with abstraction can spark creativity, foster reflection, and enliven any room. Embrace your unique perspective, let abstract wall art challenge your perceptions, and enjoy the endless exploration.
Läs mer
Is it Suitable to Hang Wood Carvings in the Bedroom?
When considering bedroom decor, the atmosphere you create matters just as much as the furniture you choose. Among the rising trends in interior design, wooden wall decor is making a notable comeback—and for good reason. Its organic warmth, timeless appeal, and capacity to reflect personal style make it a wonderful addition to nearly any space, especially the bedroom. But is it truly suitable to hang wood carvings in such an intimate, restful environment? The answer is a resounding yes—when chosen thoughtfully. Why Choose Wooden Wall Decor for Your Bedroom? Bedrooms are personal sanctuaries. Unlike public spaces like the living room or kitchen, they offer the chance to express a more intimate aesthetic. Wood carvings, with their natural textures and unique patterns, infuse warmth and comfort, two essential qualities of a cozy bedroom. Wood also carries emotional weight. For example, a hand-carved panel depicting a serene forest scene can evoke childhood memories of camping, hikes, or tranquil retreats in nature. That nostalgic, emotional connection helps transform a bedroom from a mere sleeping space into a comforting retreat. Moreover, wooden decor often creates a soothing visual and tactile experience. The subtle grain lines, smooth finishes, or intricately carved details draw the eye and offer a level of craftsmanship that mass-produced art often lacks. This sense of authenticity can significantly enhance your room's calming effect. Style and Substance: Matching Decor with Mood Wood carvings come in various themes and styles. Some showcase the elegance of floral or abstract Art Nouveau designs, while others reflect rustic or tribal motifs. The key to making them work in your bedroom is to align them with your intended mood: Serenity: Choose flowing, symmetrical designs like vines or mandalas. These pieces promote balance and peace, perfect for unwinding after a long day. Inspiration: Opt for carvings of birds in flight, mountain ranges, or celestial elements. These inspire imagination and lift your spirits. Rustic warmth: Lean into textured, raw-edge pieces made from reclaimed wood. These work wonderfully in farmhouse or cottage-style interiors. Modern elegance: Minimalist, geometric carvings in smooth, stained wood tones suit contemporary bedrooms beautifully. Explore a wide range of designs in our Wood Wall Art to find pieces that best align with your bedroom's ambiance. Durability and Practicality One concern some homeowners have is whether wood carvings are durable enough for a bedroom environment. In fact, bedrooms tend to be one of the best locations for wood art. Unlike kitchens or bathrooms, which experience high humidity and temperature fluctuations, bedrooms maintain more stable conditions, making them ideal for preserving carved wood pieces. Additionally, high-quality wood carvings are often made from durable hardwoods like oak, teak, or walnut. These woods are naturally resistant to cracking or warping over time. To better understand which types of wood fare best over time, check out our in-depth post: the durability and texture of different wood carvings. Choosing the Right Piece for Your Space Not all carvings are created equal. When selecting art for your bedroom walls, consider these key factors: Size: Large panels can anchor a wall behind the bed or serve as a visual centerpiece. Smaller pieces work well in reading nooks, along narrow walls, or grouped in a gallery-style arrangement. Color: Light woods like birch, ash, or maple can brighten darker rooms. In contrast, darker woods like walnut or mahogany add depth and richness to rooms with lighter color palettes. Framing and Finish: A natural finish emphasizes the wood's grain and authenticity. Painted or stained pieces can complement other colors in your bedroom, tying the whole design together. Theme Consistency: Choose motifs that echo or complement other design elements in your space—floral carvings in a botanical-themed room, for instance, or abstract art in a minimalist setting. Need help deciding what would look best? We cover essential tips in our blog: choose the best wood carvings. Placement Ideas: Where to Hang Wood Carvings in the Bedroom Wondering where to display your wooden wall art for maximum effect? Here are a few placement ideas that work especially well: Above the Headboard: A horizontal or triptych carving anchors the bed and creates a focal point. Opposite the Bed: Let the first thing you see in the morning be something beautiful and inspiring. Reading Corners: A single small carving can warm up a reading nook, adding both texture and personality. Gallery Wall: Mix wood carvings with framed artwork or photos for a dynamic, layered look. Maintenance Tips: Keeping Your Decor Pristine Worried about dust or damage? Wood carvings are easier to maintain than you might think. Regular dusting with a microfiber cloth and occasional light cleaning go a long way in preserving their beauty. Be sure to avoid excess moisture, direct sunlight, and harsh chemicals to keep your carvings in pristine condition. If you’re unsure how to safely clean your piece, our blog post How to Clean Wood Carvings Without Damaging the Art offers step-by-step guidance to help keep your pieces looking like new for years to come. Final Thoughts Wood carvings are not only suitable for bedroom decor—they can be transformative. The right wooden wall decor elevates your space, reflecting your unique style and creating a mood that supports rest, relaxation, and inspiration. Whether you’re curating a serene oasis, a cozy hideaway, or a stylish sanctuary, wood carvings offer an artistic, enduring, and meaningful touch. With the vast options available today, incorporating wood art into your bedroom is not just feasible—it's a design-savvy choice with lasting emotional and aesthetic value. Explore our full collection and find the piece that speaks to you.
Läs mer
Which Acrylic Paint Should I Use For Painting Crystal?
Start your journey in crystal painting with us! Have you ever wondered which acrylic paint works best for painting crystals? It's difficult since crystal is nonporous. However, with the correct paint, your crystal art may really stand out. We'll look at why acrylic paint is ideal for painting crystals and how to achieve the best results. Be sure to explore our stunning crystal wall art collection for inspiration! 1. Understanding the Basics of Acrylic Paint Acrylic paint is ideal for a variety of art tasks, including painting on glass and crystal. It's popular for its adaptability and dependability. In addition, knowing how it works and what it's built of is essential for creating beautiful artwork. 1.1 Composition and Properties Acrylic paint combines pigment with an acrylic polymer emulsion. It dries quickly, allowing artists to layer colors efficiently. In addition, it's also durable and water-resistant when dried, making it ideal for both indoor and outdoor use. These characteristics make it ideal for detail work on smooth surfaces such as glass and crystal. 1.2 Why Choose Acrylic Paint for Painting Crystals? Acrylic paint adheres easily to crystal surfaces, making it an excellent choice. It forms a strong bond, keeping your artwork vivid and long-lasting. In addition, it can be used for decorations, utility objects, and large projects. It is also chip and fade resistant once sealed. This will keep your artwork looking sharp and detailed. 2. Choosing the Best Acrylic Paint for Crystal Choosing the appropriate acrylic paint for painting crystals is essential. You need to consider the brand and colors. This will help you achieve the greatest look and highlight the brilliance of your crystal. 2.1 Top Brands To Consider Many top brands are ideal for painting crystal. They include: Liquitex: With its brilliant colors and high viscosity, it is ideal for creating detailed crystal art. FolkArt: It offers a specific enamel paint for glass and crystal. It is long-lasting and has a polished appearance. DecoArt: This acrylic paint adheres well to crystal. They provide versatile alternatives. 2.2 Color Selection Tips Choosing the appropriate colors for your crystal art is critical. Here are a few tips: Vibrancy: Choose bold, vivid hues. They will stand out and look amazing due to the light-refracting qualities of the crystal. Transparency: Transparent or semi-transparent colors can provide stunning stained-glass effects. They make your crystal pieces even more beautiful. Blending: Choose colors that blend well. This enables smooth transitions and gradient effects on the crystal. By selecting the correct acrylic paint brands and colors. Then, your crystal artwork will look great and last a long time. 3. Prepare Suitable Crystal Painting Tools To create beautiful designs on crystal, you will need the appropriate painting tools. The appropriate painting tools can help your artwork look better and be applied more easily. 3.1 Brushes and Tools Choosing the appropriate brushes is critical when painting with acrylics on crystal. Both synthetic and natural bristle brushes have the following advantages: Synthetic Brushes: They are ideal for detailed work due to their firmness and precision. Natural Bristle Brushes: They are ideal for creating wide strokes and a textured effect. Along with brushes, you'll need several additional painting tools. This includes: Sponges: They are useful for creating texture and unusual patterns. Palette Knife: Ideal for mixing paint and applying heavy layers. 3.2 Additional Painting Tools For long-lasting and vivid effects, you'll need some more supplies: Heat Tool: Use a heat tool to speed up paint drying and improve adhesion to crystals. Sealant Spray: It can protect artwork from scratches and damage, providing a durable finish. Acrylic Mediums: Use acrylic mediums to enhance the texture and sheen of your work. By selecting high-quality acrylic paint supplies and tools, you can create stunning crystal art that will last. 4. Preparing the Crystal Surface for Painting Before you begin your crystal painting, make sure the surface is well prepared. This phase involves cleaning and priming. It makes the paint stickier and lasts longer. 4.1 Preparation Materials Rubbing alcohol or glass cleaner Lint-free cloth High-quality primer for crystal Clean workspace free of dust and debris Having these materials ready makes it easier to prepare the crystal surface. It provides a fantastic foundation for your acrylic painting. 4.2 Cleaning & Priming Cleaning the crystal is the first step. It removes dust, oils, and other contaminants that can interfere with the paint. You can use rubbing alcohol or a quality glass cleaner. Then, wipe it down with a gentle cloth to eliminate any dirt. After cleaning, prime the crystal surface. To create a sturdy base, use a glass primer. This allows the paint to adhere more effectively and extends the life of your artwork. Before painting, follow the primer's directions and allow it to cure completely. 5. Painting Techniques with Acrylic Paint on Crystal Acrylic painting on crystal can yield amazing results. You can use standard brushes or attempt novel techniques such as sponge painting. Let's look at two key approaches to get you started. 5.1 Brush Techniques Brush painting with acrylics allows you to express your work in a variety of ways. The type of brush and its size have a significant impact on the appearance of your artwork. Fine Detail Brushes: Enhance your art with precise details and lines. Flat Brushes: They are ideal for wide strokes and covering large areas, making them highly flexible. Round brushes: They are suitable for both minute details and large strokes, making them ideal for creating organic shapes. 5.2 Sponge and Stencil Methods Sponges and stencils create texture and patterns in your crystal art. Sponge painting creates a textured effect, whereas stencils produce exact designs. Sponge Painting: Soak a sponge in paint and dab it onto the crystal. This produces a soft, textured look. Stenciling Methods: Apply a stencil to the crystal and paint inside with a sponge or brush. This produces neat, detailed patterns. Learning these skills can help you create more advanced crystal art. Whether you use brushes, sponges, or stencils, each method brings something unique to your work. 6. How to Seal and Protect Your Finished Crystal Art After you've finished your crystal art, seal the acrylic paint. It protects your work from damage while still keeping it looking beautiful. Sealing prevents UV rays and moisture from damaging your artwork, keeping it looking new. 6.1 Sealing Methods You can use spray-on or brush-on sealants for acrylic paint on crystals. Each has its own advantages: Spray-on Sealants: This sealant is ideal for large areas and provides a smooth finish. They are quick to use and perform effectively on precise areas without causing paint damage. Brush-on sealants: They are ideal for minor applications that require precision. In addition, they let you choose where you apply the sealant, which is ideal for detailed work. 7. Conclusion Now you've got tips on how to paint with acrylic paint on crystal. We looked at the unique properties of acrylic paint and how to prepare crystal surfaces. Each step is outlined to ensure that your artwork looks excellent and lasts long. Choosing the correct acrylic paint and instruments is essential for crystal painting. In addition, learning varied techniques, like brush strokes and sponge methods, allows for greater creative expression. Sealing your crystal art is the final step in keeping it protected and looking brilliant. Don't forget to explore our contemporary wall art for sleek, modern statements that complement any decor.
Läs mer
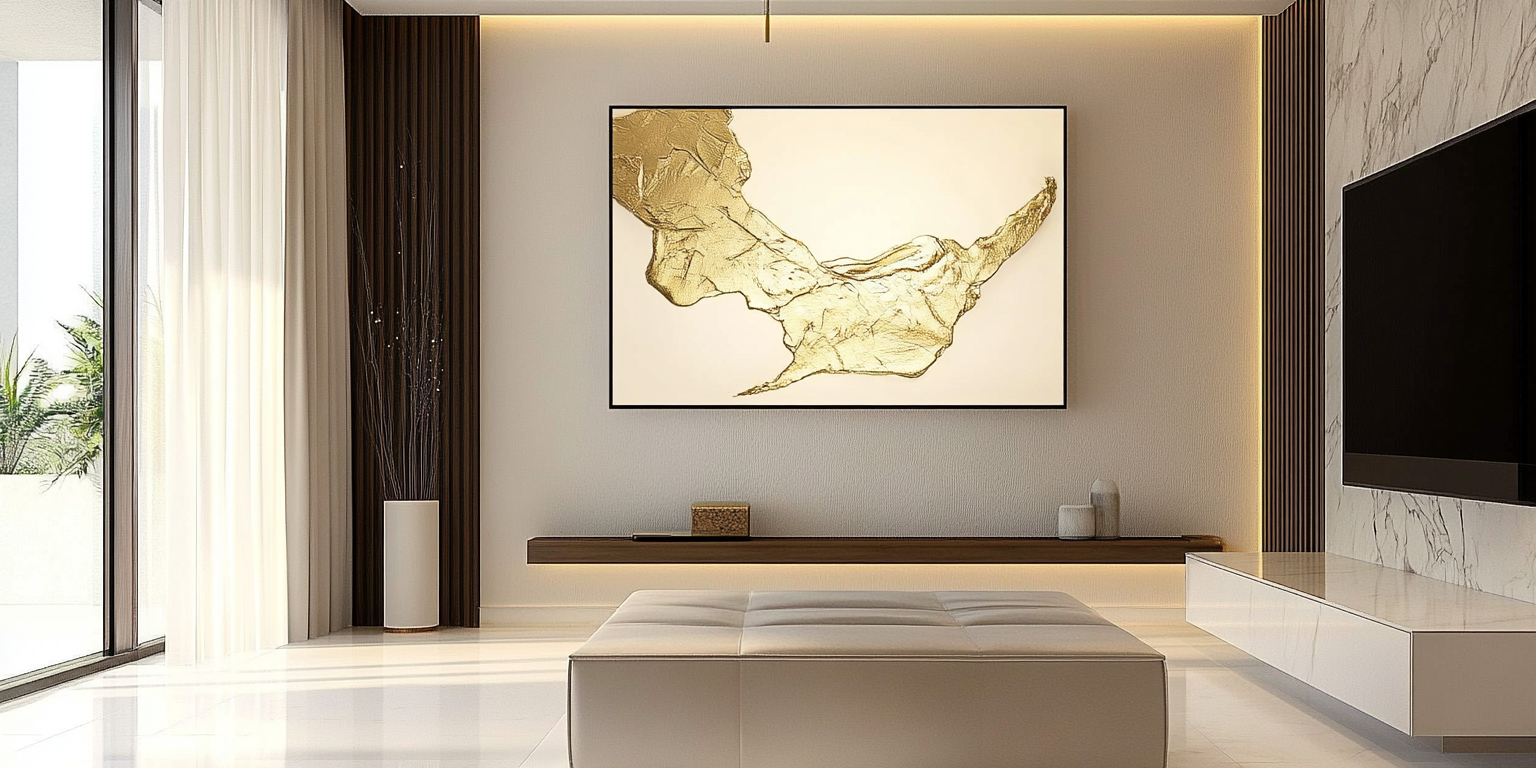
How to Decorate a Large Wall in the Living Room?
Wide, empty living room walls can quickly become unsightly. Meticulously designed and tasteful walls, on the other hand, enhance the entire space. For this reason, it is vital to decorate the large walls in your living room. An exceptionally large wall can be the center of attention, so it's vital to make sure it's designed to stand out. Are you struggling with how to decorate a large wall in your living room? If you don't have proper planning and layout beforehand. Then, when you're hanging wall art or decorations, the placement can leave embarrassing gaps. To avoid leaving lots of holes in your walls. Art Nouveau Vision suggests that you trace each piece of art on vellum paper and lay everything out with vellum tape. Then, move the vellum around as needed until the placement is just right. 1. How to Decorate a Large Wall in My Living Room? When starting to decorate a large area of walls in your living room, focus on your specific style. You should not simply copy the inspiration. It is because the wall art decoration for the living room will reflect your taste. Therefore, you need to choose the perfect wall art for your living room. Once you have determined your own style of modern wall art for the living room. Then, you can concentrate on filtering out choices that don't fit the aesthetic or space. This can reduce the costly expense of redecorating large walls in the future. Here are some basic guidelines for decorating large walls with wall art: When decorating a large wall with a group of artwork, each piece should be spaced about 3-6 inches apart. Otherwise, your collection may appear too fragmented or unconnected. When hanging art decorations on a wall, make sure the centers are about 57“-60” from the floor. This is because this is the optimal eye level. If you want to hang wall art above a sofa, hang it 8-10 inches above the top of the sofa. When hanging wall art above a fireplace, leave 3-6 inches between the wall art and the fireplace. When hanging 1-2 large decorative pieces above a sofa, keep the total width at about two-thirds of the width of the sofa. It is important to note that you should always choose objects that are appropriate for the size of your area. In addition, you should look for objects that fit the architecture and design of your current space. Then, you should measure the height and width of the walls, as well as the height and width of each item to be hung. In addition, if you are not sure how to plan the layout of your wall art portfolio. Then, before you hang any items, use masking tape to draw an outline of the items you are considering hanging. 2. 7 Ways to Decorate a Large Living Room Wall Here are some ideas in the form of how to decorate large living room walls. For large projects, these tips are easier to implement than you might think. A blank canvas allows you to experiment with a variety of design options, from classic to minimalist. But before you gather inspirational photos, wall art, and decor, consider a few tips. Art Nouveau Vision will detail a professional approach to design. This can ensure a stunning display all over the large walls of your living room. 2.1 Hang Oversized Artwork Looking for a bold and contemporary look? Consider hanging several large pieces from the Contemporary Wall Art collection. Uniformly sized art adds cohesion and elegance, making your space feel intentional and upscale. If you are looking for wall decorations for your living room and want to keep a fresh feel. Then, you can hang several large pieces of art. You can use several pieces of wall art that are the same size. This will make the space feel thoughtful and expensive. Also, you may need to know the complete guide on how to buy large wall art. 2.2 Design a Gallery Wall If you can’t find one statement piece, why not create your own with a salon-style gallery wall? Use smaller artwork from the Abstract Wall Art to fill the space. Whether you opt for linear precision or a more freeform arrangement, planning ahead will help you achieve a polished look. 2.3 Add Photos to Shelves Floating shelves offer a great way to showcase your favorite photos and artwork while also offering functionality. Use them to rotate seasonal décor, showcase collectibles, or hold small pieces from the Minimalist Wall Art. 2.4 Put Up Patterned Wallpaper You may not imagine that a little wallpaper goes a long way. Patterned wallpaper can turn an entire wall into a work of art. If you don't want to put up wallpaper, then you can also buy some funky or funky gift wrap and frame the pieces into a collection. This gives you the flexibility to change your wall decorations often and have fun without breaking the bank. 2.5 Create Architectural Interest To enhance the depth and dimension of your living room decor, it is recommended that you use architectural elements such as baseboards or crown molding. You can purchase some boards from your local home improvement store and install them on the wall in the pattern of your choice. You can then add a layer of interest to your living room. Adding architectural elements to your walls will help inject some character into your space. If you can't add trim or molding to your walls, floating shelves can be a reasonable and storage-friendly alternative. 2.6 Integrate Decorative Furniture Additionally, you can use decorative furniture to fill large wall areas in your living room. You can add a sculptural table, a decorative chair, or even a decorative ladder. These are great ways to break up the space. For example, if you have a wooden ladder in your home. Then, you can use it to stack woven blankets. Not only does this create a stylish storage solution, but it also minimizes clutter. 2. 7 Use Bold Colors Color is probably the most basic and economical way to decorate large walls. You can paint a large wall in a vibrant hue and then make a statement with a large piece of art. If the room is well-lit, somber dark colors such as charcoal gray or dark green will bring instant drama in a novel way. For a modern effect, you can use color to create a graphic design. Additionally, you can add shades of fabrics and finishes throughout the space to create a coherent design. 3. Summarizing Decorating a large wall in your living room is the perfect opportunity to enhance the entire space. Whether you choose a piece of wall art that makes a statement or create a gallery wall. You'll need to be careful to balance scale, color, and texture. Take the time to choose pieces that reflect your personal style but also complement the overall aesthetic of the room. With the right approach, a large living room wall can be transformed from an empty space into a beautiful focal point.
Läs mer
Tempera vs Acrylic Paint: What's the Difference?
If you have read about the difference between acrylic paint and oil paint. Then, you may have noticed that tempera paints and acrylic paints have extremely similar properties. Most people can't tell the difference between tempera and acrylic paints. Both painting mediums look and act very similar. They both create stunning works of art. Despite their similarities, there are some key differences that give them distinctive characteristics. Understanding these differences will help you make a more informed choice. 1. What Are Acrylics? Acrylics were introduced in the 1950s. They are now one of the most popular types of pigment. These paints suspend pigments in an acrylic emulsion, which acts as a binder for the pigments. Most acrylic paints use water as the medium. When the water evaporates, the colors left behind are layered on top of each other in the presence of the acrylic binder. The use of acrylic polymers makes acrylic paints water soluble and also more durable than tempera paints. 1.1 Advantages of Acrylic Paints Because of its composition and water solubility, acrylic pigment has special properties. These advantages include the following: Versatility: Acrylic paint can be mixed with other acrylic paints. In addition, it can be combined and mixed with acrylic pigment mediums and additives. This gives acrylics a distinctive character and allows you to create more stunning effects. Vibrant Colors: Acrylics can be used with natural or synthetic pigments. Therefore, they are incredibly colorful. By mixing and blending, an almost infinite variety of shades and tones can be created. It Can Be Used on Most Surfaces: Acrylic paints can adhere to any porous surface. This includes paper, cardboard, foam, leather, wood, concrete, and stone. Especially if properly prepped and primed. Easy to Use: Acrylic paints are easier to use. You don't need to buy harmful or toxic chemicals to dilute acrylic paints. Durable: Acrylics bond the pigments together after they dry. Therefore, acrylic paints retain their color for a longer period of time, even if they are not sealed with varnish. Fast Drying: Since most acrylic paints are water-based. Therefore, they dry faster than other forms of pigments. 1.2 Disadvantages of Acrylic Paints There is no such thing as a perfect item in the world, and the same is true for acrylic paints. The properties of acrylic paints make them pleasing to some painters but unsuitable for others. Acrylic paints have the following disadvantages: Too Many Choices: Acrylic paints are available in almost every hue you can think of. Some painters may be overwhelmed by the number of color combinations. Darkens When Dry: Most acrylic paints dry to a darker color. So be aware of this when using them. Dries Quickly: Since acrylic paints dry quickly, you may need to limit the time you spend creating. This is especially true when creating on canvas, such as mixing. Additionally, acrylic paint dries quickly in a palette or brush, so it will need to be replenished or loaded frequently. Not all Surfaces Are Suitable: Although acrylic paint adheres well to porous surfaces. However, non-porous materials (such as glass, metal, and some plastics) do not respond well to acrylics or any other pigments. Difficult to Remove When Dry: Acrylic paint is easy to clean with soap and water when wet. However, when it dries, it is very difficult to remove. 2. What Are Tempera Paints? The name “tempera” originally referred to a painting medium. In this medium, pigment is mixed with a water-soluble binder, such as egg yolk, to create a permanent, quick-drying work of art. These tempera paints were used as early as the third century and were eventually replaced by oil paints in the 15th century. Today's tempera pigment (also known as “poster pigment”) is a distilled pigment. It binds the pigment with starch, cornstarch, cellulose, gum water, or other binders. This pigment usually comes in jars or bottles and is also available in powder form. Like acrylics, tempera paints use water as a medium and usually dry within 5 to 10 minutes. The exact time depends on the thickness of the paint layer as well as the temperature and humidity of the surrounding environment. 2.1 Advantages of Tempera Paints Egg tempera paints, like watercolors, are one of the oldest painting media known to painters. Today's poster pigments have a variety of properties that some artists find useful. They have the following advantages: Water-based: Tempera paints are water-based. Therefore, their viscosity is easily changed with water. Moreover, they are easy to clean even after drying. Safe and Odorless: Tempera paints are safe to use and odorless. This means that you can use them in small enclosed places such as bedrooms or cellars. Variety of Options: Tempera paints come in a variety of shades, both in cans/bottles and in powder form. This opens up some fascinating creative possibilities. Fast Drying: Since these pigments are water-based, they dry quickly and have a matte finish. Affordable: Tempera paints are available in most art stores at prices to suit any budget. 2.2 Disadvantages of Tempera Paints However, tempera paints also have some disadvantages that distinguish them from acrylic paints. These disadvantages include the following: Requires a Porous Surface: Tempera paint is usually used on paper or cardboard because they require a porous surface. As a result, it can be used on Styrofoam, wood, stone, and concrete, but not on plastic, glass, fiberglass, or metal. Poor Durability: Tempera paints usually have poor durability. Even when sealed with varnish, they can crack, flake, or peel over time. Reactivated by Water: Although tempera paints are easier to clean and less likely to stain. However, they reactivate when exposed to water. Easy to Mix Colors: Since tempera paints reactivate quickly when exposed to water. Therefore, when applying a new layer of tempera paint on top of the old one, it is easy to mix the colors. 3. What is the Difference between Acrylic Paint and Tempera Paint? Now that you know more about acrylic paints and tempera paints, what is the difference between them? To make it easier to compare these two common painting mediums, consider the following factors: 3.1 Color Vividness and Opacity Acrylic and tempera paints are not comparable in terms of color richness and opacity. This may be related to the way in which both pigments were developed. As mentioned earlier, acrylic pigments consist of pigments dispersed in a polymer emulsion. This polymer emulsion holds the pigment particles together as the water dries, allowing acrylic pigments to retain their color and brightness over time. Similarly, tempera paints are prepared by combining pigments with a water-soluble binder, such as starch or other binders. The binder, like acrylic paint, keeps the pigment in place after the water evaporates. Once the pigments have dried, it is difficult to tell them apart. However, tempera paints dry flat and matte. Acrylic paints, on the other hand, leave a clean, glossy surface. 3.2 Mixing and Coloring Acrylic paints are great for mixing and blending. Acrylic paints dry quickly and are, therefore, difficult to mix. However, you can use acrylic paint mediums or acrylic paint retarders to prolong its action. In contrast, poster pigments are easily reactivated by water. This can lead to mixed shades rather than the desired mixing effect. 3. 3 Health and Safety Considerations As long as the manufacturer's instructions are followed and health and safety are observed. Then, acrylic and tempera paints are generally safe to use. For example, acrylic paints contain synthetic polymers that release toxic gases when heated or burned. Therefore, use acrylic paints away from open flames or heat sources. On the other hand, tempera paint has the reputation of being “non-toxic”. However, it should not be used as face or body paint. If it comes into contact with the skin, it should be rinsed off with soap and water. 4. Summary Tempera paints are as vibrant and opaque as acrylics. They dry faster and are less expensive than acrylics. Acrylic paints are more versatile, easier to mix, and more durable. In addition, painting with acrylics produces a smoother result. Acrylic paints may be slightly more expensive. But for the performance of the paints, the price you pay is worth it.
Läs mer
How to Clean Wood Carvings Without Damaging the Art?
Wood carvings bring warmth, depth, and personality to any space—but just like any piece of art, they require a little TLC to maintain their beauty over time. Whether it’s a detailed floral panel or a bold abstract sculpture, proper care ensures your wood art remains striking for years to come. If you're investing in timeless wood decor, it's just as important to know how to clean and preserve it. Want to elevate your space with handcrafted wood art? Make sure you know how to care for it the right way. 😉 Dusting: Your First Line of Defense Dust may seem harmless, but over time it can dull the finish and settle into fine grooves. Use a soft-bristle brush, like a clean makeup brush or artist’s paintbrush, to gently sweep away dust. For example, a client with an intricate oak carving of a cherry blossom tree uses a camel hair brush weekly to keep the petals pristine. Never use feather dusters—they can snag or leave scratches. A microfiber cloth is great for flat surfaces but may miss crevices. A small handheld vacuum on the lowest suction setting (with a soft brush attachment) can also be useful for larger pieces. You can explore beautifully detailed pieces in our Wood Wall Art collection, many of which feature delicate lines that benefit from regular gentle cleaning. Dealing With Grime and Fingerprints Over time, natural oils from hands can create smudges, especially on lighter woods like maple or pine. For spot cleaning, dampen a soft cloth with distilled water—never soak it! Add a drop of mild dish soap if needed, but avoid any harsh cleaners or sprays. A client once used a citrus-based cleaner on a walnut carving and accidentally stripped the finish 😱—a cautionary tale! Always test on a hidden section first. Protecting the Finish After cleaning, allow your wood carving to dry fully. If the finish looks dull, you can apply a small amount of beeswax-based wood polish. Rub it in gently with a cotton cloth, following the grain. Avoid silicone-based products—they can create buildup or interfere with future refinishing. If you're into organic curves and natural movement in design, many pieces in our Curved Wall Art collection showcase finishes that need this kind of careful maintenance to stay radiant. Avoid Moisture and Direct Sunlight Wood is naturally sensitive to its environment. Humidity can cause swelling or cracking, and direct sunlight can bleach certain wood tones over time. Display your carving in a well-ventilated area away from heat vents or windows. We recently helped a client move a custom piece out of a sun-drenched corner after they noticed fading—lesson learned! 🌞 You can read more about the properties of various woods and how they hold up under environmental conditions in our blog Exploring the Durability and Texture of Different Wood Carvings. Seasonal Deep Cleaning Once or twice a year, give your carvings a deeper clean. Remove them from the wall (if possible), inspect for buildup or changes, and treat the surface with a nourishing polish. This is also a good time to reassess the piece’s placement and condition—has the lighting changed? Is it still the centerpiece of the room? Our guide choose the best wood carvings offers tips on placement and matching pieces with interior styles. Custom Carvings Need Special Love If your carving is a custom piece, it likely contains more delicate or irregular detailing. For these, follow the care instructions provided by the artist or creator. At customization process of wood carvings, you can learn how each step of the process influences long-term care—especially finishing techniques. Final Thoughts Cleaning wood carvings isn’t just about maintenance—it’s about respect for the craft. With just a little care, your wood piece can remain a vibrant part of your space for generations. 🪵 Be sure to use gentle tools, avoid harsh conditions, and stay consistent. Whether you're caring for a family heirloom or a brand new sculpture, the love you put in will always show.
Läs mer
What is the Customization Process of Wood Carvings?
Wood carvings have long been a symbol of craftsmanship and timeless beauty. At their best, these intricate artworks do more than fill a space—they tell a story, evoke emotion, and showcase individuality. Whether you’re revamping your interior or adding a signature piece to your gallery wall, custom wood carvings offer an exquisite solution. But what exactly does the customization process entail? In this guide, we’ll take you through the artistic journey, from concept to creation, that goes into each unique piece of wood art. If you’re seeking a standout statement piece, consider how a handcrafted wooden for wall decor item can elevate your space. Beyond aesthetics, it’s a personalized design experience that lets your imagination take form in finely carved wood. ✨ Step 1: Inspiration and Idea Development The journey begins with a vision. Clients typically come to us with a theme, mood, or space in mind. For instance, a family designing a cozy mountain cabin may request a panel that captures nature—think pine trees, deer, or swirling clouds. Others might be drawn to abstract patterns or Art Nouveau-inspired curves. Our artists work closely with clients to understand: The desired style (minimalist, detailed, classic, modern) The dimensions and shape (square, rectangular, round, or freeform) The wood tone (light pine, rich walnut, deep cherry) Any personal symbolism or motif (floral vines, family crests, celestial elements) These consultations often spark creative ideas. For example, one client wanted a mural of waves inspired by Japanese woodblock prints—this resulted in an elegant, flowing piece with movement etched into every curve. Step 2: Sketches and Digital Mockups Once the creative direction is finalized, the artist begins drafting. These sketches can be done by hand or digitally, and they allow for quick feedback and revisions. A recent project featured a stylized phoenix—an emblem of rebirth and transformation. Our team provided three interpretations, each with its own composition and energy. Mockups are particularly useful in previewing placement and scale. Whether your carving will hang above a fireplace or beside a stairwell, digital previews help you visualize balance and flow. Step 3: Material Selection and Preparation This step is crucial—different woods yield different results. We offer high-quality, sustainably harvested woods like oak, walnut, maple, and cherry. For instance, oak’s deep grain adds rich texture, perfect for nature motifs. Cherry provides a smoother surface, ideal for carvings with fine detail. You can learn more about these material characteristics in our blog exploring the durability and texture of different wood carvings. Each board is carefully prepared—cut, planed, and checked for knots and imperfections—to ensure a flawless canvas. Step 4: Carving and Detailing Here’s where the magic happens. Our artisans combine traditional hand tools with precise CNC carving for optimal results. Details are everything—from the ripple of a leaf to the feathering in a bird’s wing. Interested in pre-designed styles or looking for inspiration? Take a look at our handpicked Wood Wall Art collection to see the range of techniques and tones available. Every line and contour is designed to play with light, casting subtle shadows that change throughout the day, creating living, breathing art on your walls. 🪵 Step 5: Finishing Touches Once the carving is complete, we sand the surfaces and apply finishes. These can range from rustic matte to high-gloss contemporary looks. Stains highlight the natural grain of the wood, while sealants protect it for years to come. Want a glossy black walnut finish that screams elegance? Or maybe a sun-kissed maple with a soft matte sheen for a cozy reading nook? We've done it all. Step 6: Mounting and Installation Function meets form here. Each piece comes with hardware suited to your wall type and display preference. Whether it’s a traditional frame or floating mount, installation is designed to be as smooth as possible. If your taste leans toward abstract or unconventional shapes, our Curved Wall Art collection features creative, flowing designs that challenge the norm and add a sense of movement. Why Customization is Worth It Choosing a bespoke piece means embracing uniqueness. One client had their wedding vows subtly engraved into a background of flowering vines—an heirloom with both visual and emotional depth. Not sure where to begin? Our guide choose the best wood carvings offers expert tips on selecting styles that match your space, lighting, and personality. Final Thoughts The process of customizing wood carvings is collaborative, immersive, and incredibly rewarding. It’s not just wall decor—it’s your story in wooden form. 🌿 With every chisel stroke and brush of stain, your idea transforms into a tangible, lasting piece of art. Explore our collections and start designing a wooden masterpiece that feels truly yours.
Läs mer
How to Choose the Best Wood Carvings for Your Space
When it comes to giving your home character, warmth, and a touch of artistry, nothing does it quite like wood wall art decor. From intricately hand-carved panels to modern geometric designs, wood carvings bring texture, soul, and story to any room. But with so many styles, wood types, and craftsmanship levels available, how do you know you're choosing the best wood carvings for your space? In this guide, we’ll walk you through what to look for when selecting quality wood wall art—covering everything from grain patterns and durability to matching with your interior style. Whether you're decorating a minimalist loft or a cozy farmhouse, we’ll help you find the perfect piece. 1. Know Your Style: Modern Minimalism or Rustic Charm? Before diving into technical details, take a moment to define the aesthetic you're going for. Do you lean toward clean, Scandinavian lines, or are you drawn to ornate, boho-inspired wall panels? For modern interiors, geometric wood wall art decor with smooth finishes—like carved teak triangles or layered birch designs—can add structured elegance. In contrast, traditional homes or nature-inspired spaces benefit from rustic, hand-carved panels that showcase natural wood imperfections like knots and grains. 💡 Tip: A piece with rough-hewn edges and visible grain can instantly warm up a sleek white wall, adding visual depth without overwhelming the space. Explore our full Wood Wall Art Collection to see a variety of styles curated for different interiors. 2. Pay Attention to the Type of Wood Not all wood is created equal. The type of wood used greatly affects the look, weight, durability, and even scent of the artwork. Teak is dense, water-resistant, and has a rich brown hue—perfect for detailed carvings. Pine is lightweight and soft, ideal for painted or distressed finishes. Mango wood offers a unique texture with earthy, golden tones. Reclaimed wood adds a sustainable story and aged character. For an in-depth breakdown of wood types and their durability, check out our guide: Exploring the Durability and Texture of Different Wood Carvings. 💡 Example: One customer paired a hand-carved reclaimed wood mandala above their fireplace, balancing the sleek concrete mantle with organic, intricate texture—proof that opposites attract beautifully. 3. Examine Craftsmanship and Finish A truly great piece of wood wall art decor reveals its value in the details. Look closely at the edges, depth of carving, and consistency of finish. Are the carvings symmetrical where they’re meant to be? Is the finish smooth or intentionally distressed? Is the back reinforced to avoid warping? High-quality pieces are often hand-finished and may take several days—or even weeks—to complete. Machine-made art may be cheaper, but it often lacks the soul and variation of handmade work. Also, consider whether you want a natural finish, which highlights the wood grain, or a painted/distressed finish, which can add color and contrast to your walls. 4. Consider Size and Scale A small 12x12" carved piece might be perfect for a nook, but it could look lost on a large living room wall. Think about the space you’re decorating: For feature walls, go bold with oversized carvings or try a triptych panel set. For entryways or hallways, vertical carvings can add flow and height. For gallery walls, mix smaller wood carvings with mirrors, photos, and textiles. 💡 Example: A large round floral carving made from mango wood can act as a statement piece above a bed—drawing the eye upward and anchoring the room. If you're unsure how to balance your space, check out our practical styling tips in: How to Decorate a Wood Wall. 5. Compare Real vs. Artificial Materials Lastly, it’s crucial to know what you’re actually buying. Many stores label MDF or engineered wood as “wood wall art,” but these materials don’t offer the same look, feel, or lifespan as solid, natural wood. Real wood has depth, variation, and tactile appeal. It also ages gracefully—sometimes even better over time. Engineered wood or plastic-based options might be cheaper but are prone to chipping, warping, and color fade. If you're weighing the pros and cons, don’t miss our detailed post: Real Wood vs. Artificial Materials, which breaks down costs, longevity, and sustainability. Final Thoughts: Let the Art Tell a Story The best wood wall art decor isn't just a visual accent—it’s a reflection of your taste, your home’s personality, and your values. Whether you choose a handcrafted lotus panel from India or a minimal walnut hexagon set, your choice of carving brings depth and meaning to the wall it lives on. Choosing quality over quantity, real over artificial, and craftsmanship over mass production ensures that your wall isn’t just decorated—it’s elevated. 🪵 Ready to Find the Perfect Wood Carving? Begin your journey with timeless, authentic design. Browse handcrafted treasures, explore thoughtful guides, and bring your walls to life with meaningful pieces. Start here: Wood Wall Art Decor
Läs mer
Real Wood vs. Artificial Materials – Which One Should You Choose?
When it comes to choosing the perfect wall art for your home, one of the biggest decisions you'll face is the choice of materials. Should you go with real wood, known for its natural beauty and timeless durability, or opt for artificial alternatives like MDF, particle board, or plastic composites? Each option comes with its own strengths—and drawbacks. In this article, we’ll dive deep into the differences between real wood and artificial materials in wall decor. From aesthetic value and texture to environmental impact and longevity, we’ll help you determine which option is the best fit for your space. The Aesthetic Appeal: Authenticity vs. Uniformity One of the most obvious advantages of real wood wall art is its organic charm and one-of-a-kind grain patterns. Whether it's carved oak, reclaimed pine, or hand-sanded walnut, no two real wood pieces are exactly alike. This gives your decor a natural richness and character that’s difficult to replicate. In contrast, artificial materials often lack this depth. Though some MDF or laminate designs are manufactured with wood-look finishes, they tend to look too uniform and can appear flat or synthetic up close. For design enthusiasts seeking warmth and texture, real wood wins. Take for example our wood wall art collection: pieces in this collection are crafted from real, sustainably sourced timber. Many feature hand-carved detailing, layered textures, and subtle color variations that make each piece a statement in its own right. Durability: Built to Last or Short-Term Style? Durability is another key factor to consider. Real wood wall art is known for standing the test of time. When properly cared for, it resists sagging, warping, and general wear and tear. If you’ve ever inherited an antique wooden piece, you’ve seen how well solid wood ages. On the other hand, artificial materials like MDF or plastic are far more vulnerable to environmental factors. Humidity can cause warping, while scratches or chips often reveal their synthetic core. These issues are especially common in high-traffic areas or places exposed to fluctuating temperatures—like kitchens, entryways, or bathrooms. If you’re curious about how different types of wood hold up under pressure, check out our in-depth blog: the durability and texture of different wood carvings. It offers insights into why materials like teak, mahogany, and maple are often chosen for heirloom-quality wall art. Environmental Impact: Sustainability Matters As consumers become more eco-conscious, the materials used in wall decor are gaining more scrutiny. Real wood, when responsibly sourced, can be a highly sustainable choice. Reclaimed or FSC-certified wood supports forest preservation and gives old materials new life. Artificial options, on the other hand, are frequently made from petroleum-based components and involve chemical-heavy manufacturing processes. While some engineered woods use recycled content, they rarely have the same environmental credentials as ethically harvested timber. For eco-minded decorators, choosing real wood wall art not only adds style to your space but also supports better environmental practices. Texture & Tactility: Feel the Difference The texture of real wood wall art is hard to beat. Whether it’s a rustic barnwood piece with hand-scraped edges or a smooth, sanded minimalist panel, the tactile quality adds richness to any wall. Wood's natural imperfections—like knots, grains, and subtle cracks—give it soul and story. Artificial materials attempt to mimic this through embossing or printing, but often fall short in creating that “real feel.” While they may look good from a distance, they rarely invite the same kind of interaction or visual intrigue. In styling guides like How to Decorate a Wood Wall, we emphasize how real wood complements stone, metal, and woven textures beautifully. Its versatility across styles—from boho to industrial—makes it a designer favorite. Cost Consideration: Budget vs. Value It’s true—artificial wall art is generally more affordable upfront. For shoppers with tight budgets or temporary decorating needs, MDF or laminated pieces can offer a modern look at a lower price point. However, real wood offers better long-term value. Its durability means you won’t be replacing it every few years, and it often retains (or increases) its aesthetic appeal over time. Think of it less as a trendy purchase and more as a design investment. Final Verdict: What’s Right for You? If you’re looking for wall art that combines beauty, texture, sustainability, and longevity, real wood is hands-down the superior choice. While artificial materials can offer budget-friendly alternatives, they often lack the richness and durability needed to elevate your space long-term. Whether you're curating a modern gallery wall or creating a rustic feature above your fireplace, real wood wall art offers a grounded, timeless aesthetic that’s hard to match. Ready to transform your space? Explore handcrafted, authentic pieces that tell a story, last a lifetime, and feel as real as they look. Visit our wall art homepage for more design inspiration, or browse our full wood wall art collection to find your perfect piece.
Läs mer